Purpose:
The purpose of this article is to display a set of commonly used Linux Commands.
"LAMP" is an acronym that stands for Linux, Apache, MySQL, and PHP/Perl/Python. It refers to a popular and widely used stack of open-source software components that are often used together to create and deploy dynamic websites and web applications. Each component of the LAMP stack serves a specific purpose:
- Linux: This is the operating system on which the LAMP stack runs. Linux is chosen for its stability, security, and open-source nature. It provides the foundation for the other components to operate.
- Apache: Apache HTTP Server (commonly referred to as just "Apache") is a web server software that's used to serve web pages to users' browsers. It handles incoming HTTP requests and serves the appropriate web content, such as HTML files, images, and other assets.
- MySQL: MySQL is a popular open-source relational database management system (RDBMS). It's used to store and manage the data for web applications. MySQL is known for its performance, reliability, and ease of use.
- PHP/Perl/Python: This component refers to the scripting languages that are used to develop the dynamic web content and interact with the database. Typically, PHP (Hypertext Preprocessor) is the most commonly used language in the LAMP stack, but alternatives like Perl and Python can also be used.
Together, the LAMP stack provides a complete environment for developing, deploying, and hosting web applications. It's important to note that while the term "LAMP" originally stood for Linux, Apache, MySQL, and PHP/Perl/Python, variations have emerged over time, such as "LEMP" (replacing Apache with Nginx as the web server), and different programming languages for the dynamic content.
Additionally, technologies and trends have evolved since the conception of the LAMP stack, and developers now have a wider range of options and alternatives for building web applications, including different web servers (like Nginx), alternative databases, and various programming languages and frameworks.
Install LAMP - Linux, Apache, MySQL, PHP
Services
systemctl --type=service --state=running
Sample Output:
UNIT LOAD ACTIVE SUB DESCRIPTION
accounts-daemon.service loaded active running Accounts Service
atd.service loaded active running Deferred execution scheduler
cron.service loaded active running Regular background program processing daemon
LOAD = Reflects whether the unit definition was properly loaded.
ACTIVE = The high-level unit activation state, i.e. generalization of SUB.
SUB = The low-level unit activation state, values depend on unit type
sudo service --status-allRestart using systemctl
sudo systemctl restart apache2Stop Apache2 service options are {start|stop|graceful-stop|restart|reload|force-reload}
sudo service apache2 graceful-stop
sudo service apache2 stop
Apache CLI Commands
sudo apt updateInstall Apache
sudo apt install apache2
You can do a spot check right away to verify that everything went as planned by visiting your server’s public IP address in your web browser (view the note under the next heading to find out what your public IP address is if you do not have this information already): http://{your IP Address}
The default Ubuntu 2X.04 Apache web page is there for informational and testing purposes.
sudo a2dissite 000-default.confEnable new Site
sudo a2ensite your_domain.conf
UFW CLI Commands (Uncomplicated Firewall for Ubuntu)
sudo ufw app listAllow Apache on Port 80
sudo ufw allow in "Apache"Get UFW status
sudo ufw statusGet your servers public IP
ip addr show ens3 | grep inet | awk '{ print $2; }' | sed 's/\/.*$//'
Alternative method using Curl
curl http://icanhazip.com
MySQL CLI Commands
sudo apt install mysql-serverOpen mysql
sudo mysqlAlter the root user's auth method
ALTER USER 'root'@'localhost' IDENTIFIED WITH mysql_native_password BY 'password';Secure MySQL install
sudo mysql_secure_installation
More MySql commands can be found Here on MySQL Potpourri Page
PHP CLI Commands
sudo apt install php libapache2-mod-php php-mysqlIntall PHP Extensions
sudo apt-get install php8.x libapache2-mod-php8.x php8.x-common php8.x-curl php8.x-mbstring php8.x-xmlrpc php8.x-mysql php8.x-gd php8.x-xml php8.x-intl php8.x-ldap php8.x-imagick php8.x-json php8.x-cliCheck PHP version
php -vRemove old versions of PHP if needed
sudo apt-get purge php7.*
Testing PHP
Now that you have a custom location to host your website’s files and folders, create a PHP test script to confirm that Apache is able to handle and process requests for PHP files.
Create a new file named info.php inside your custom web root folder:
nano /var/www/html/info.php
In the Nano Editor type:
<?php
phpinfo();
Ctrl + O = Will write out the file
Ctrl + X = Will exit Nano
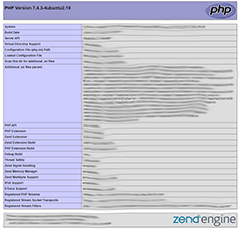
Navigate to http://server_domain_or_IP/info.php
To view a info about PHP to verify it is working properly.
Example image below:

System Information
cat /etc/os-releaseDisplay Linux system information
uname -aDisplay kernel release information
uname -rShow how long the system has been running + load
uptimeShow system reboot history
last rebootShow system host name
hostnameDisplay all local IP addresses of the host.
hostname -IShow the current date and time
dateShow this month's calendar
calDisplay who is online
wWho you are logged in as
whoami
Hardware Information
dmesgDisplay CPU information
cat /proc/cpuinfoDisplay memory information
cat /proc/meminfoDisplay free and used memory ( -h for human readable, -m for MB, -g for GB.)
free -hDisplay PCI devices
lspci -tvDisplay USB devices
lsusb -tvDisplay DMI/SMBIOS (hardware info) from the BIOS
dmidecodeShow info about disk sda
hdparm -tT /dev/sdaTest for unreadable blocks on disk sda
badblocks -s /dev/sda
PERFORMANCE MONITORING AND STATISTICS
topInteractive process viewer (top alternative)
htopDisplay processor related statistics
mpstat 1Display virtual memory statistics
vmstat 1Display I/O statistics
iostat 1Display the last 100 syslog messages (Use /var/log/syslog for Debian based systems.)
tail -100 /var/log/messagesCapture and display all packets on interface eth0
tcpdump -i eth0Monitor all traffic on port 80 ( HTTP )
tcpdump -i eth0 'port 80'List all open files on the system
lsofList files opened by user
lsof -u userDisplay free and used memory ( -h for human readable, -m for MB, -g for GB.)
free -hExecute "df -h", showing periodic updates
watch df -h
USER INFORMATION AND MANAGEMENT
idDisplay the last users who have logged onto the system.
lastShow who is logged into the system.
whoShow who is logged in and what they are doing.
wCreate a group named "test".
groupadd testCreate an account named john, with a comment of "John Smith" and create the user's home directory.
useradd -c "John Smith" -m johnDelete the john account.
userdel johnAdd the john account to the sales group
usermod -aG sales john
FILE AND DIRECTORY COMMANDS
ls -alDisplay the present working directory
pwdCreate a directory
mkdir directorynameRemove (delete) file - Single file
rm fileRemove the directory and its contents recursively
rm -r directorynameForce removal of file without prompting for confirmation
rm -f directorynameForcefully remove directory and all files within recursively
rm -rf directorynameCopy file1 to file2
cp file1 file2Copy source_directory recursively to destination. If destination exists, copy source_directory into destination, otherwise create destination with the contents of source_directory.
cp -r source_directory destinationRename or move file1 to file2. If file2 is an existing directory, move file1 into directory file2
mv file1 file2Create symbolic link to linkname
ln -s /path/to/file linknameCreate an empty file or update the access and modification times of file.
touch fileView the contents of file
cat fileBrowse through a text file
less fileDisplay the first 10 lines of file
head fileDisplay the last 10 lines of file
tail fileDisplay the last 10 lines of file and "follow" the file as it grows.
tail -f file
PROCESS MANAGEMENT
psDisplay all the currently running processes on the system.
ps -efDisplay process information for processname
ps -ef | grep processnameDisplay and manage the top processes
topInteractive process viewer (top alternative)
htopKill process with process ID of pid
kill pidKill all processes named processname
killall processnameStart program in the background
program &Display stopped or background jobs
bgBrings the most recent background job to foreground
fgBrings job n to the foreground
fg n
There are several common signals that can be used with the "kill" command, each serving a specific purpose. Some of the more commonly used signals include −
- TERM (15) − This is the default signal used by the "kill" command. It requests that the process terminate gracefully, allowing it to clean up any resources or save any data before exiting.
- HUP (1) − This signal is used to hang up or disconnect a process. It's often used to restart a process or to refresh its configuration.
- INT (2) − This signal is used to interrupt a process, and is similar to pressing the "CTRL+C" keys on the keyboard.
- KILL (9) − This signal is used to immediately terminate a process, without allowing it to clean up or save any data. This signal cannot be ignored by the process.
- STOP (19) − This signal is used to stop a process temporarily, allowing it to be resumed later.
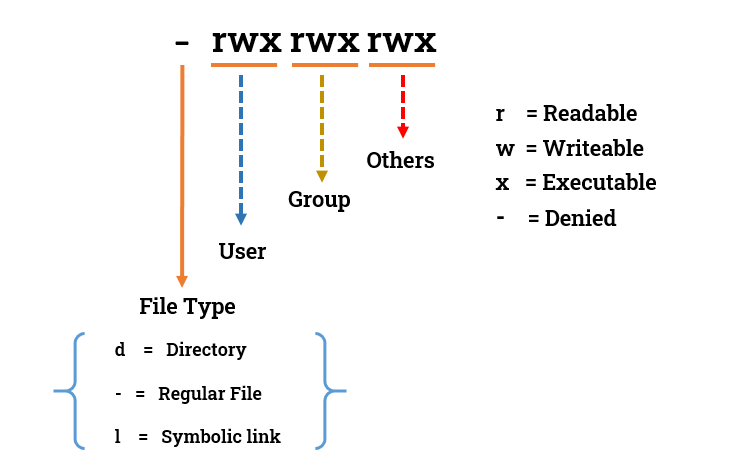
FILE PERMISSIONS

NETWORKING
ip addrDisplay eth0 address and details
ip addr show dev eth0Query or control network driver and hardware settings
ethtool eth0Send ICMP echo request to host
ping hostDisplay whois information for domain
whois domainDisplay DNS information for domain
dig domainReverse lookup of IP_ADDRESS
dig -x IP_ADDRESSDisplay DNS IP address for domain
host domainDisplay the network address of the host name.
hostname -iDisplay all local IP addresses of the host.
hostname -IDownload a file at http://domain.com/file
wget http://domain.com/fileDisplay listening tcp and udp ports and corresponding programs
netstat -nutlp
ARCHIVES (TAR FILES)
tar cf archive.tar directoryExtract the contents from archive.tar.
tar xf archive.tarCreate a gzip compressed tar file name archive.tar.gz.
tar czf archive.tar.gz directoryExtract a gzip compressed tar file.
tar xzf archive.tar.gzCreate a tar file with bzip2 compression
tar cjf archive.tar.bz2 directoryExtract a bzip2 compressed tar file.
tar xjf archive.tar.bz2
INSTALLING PACKAGES
yum search keywordInstall package.
yum install packageDisplay description and summary information about package.
yum info packageInstall package from local file named package.rpm
rpm -i package.rpmRemove/uninstall package.
yum remove packageInstall software from source code
tar zxvf sourcecode.tar.gz
cd sourcecode
./configure
make
make install
SEARCH
grep pattern fileSearch recursively for pattern in directory
grep -r pattern directoryFind files and directories by name
locate nameFind files in /home/john that start with "prefix".
find /home/john -name 'prefix*'Find files larger than 100MB in /home
find /home -size +100M
SSH LOGINS
ssh hostConnect to host as user
ssh user@hostConnect to host using port
ssh -p port user@host
FILE TRANSFERS
scp file.txt server:/tmpCopy *.html files from server to the local /tmp folder.
scp server:/var/www/*.html /tmpCopy all files and directories recursively from server to the current system's /tmp folder.
scp -r server:/var/www /tmpSynchronize /home to /backups/home
rsync -a /home /backups/Synchronize files/directories between the local and remote system with compression enabled
rsync -avz /home server:/backups/
DISK USAGE
df -hShow free and used inodes on mounted filesystems
df -iDisplay disks partitions sizes and types
fdisk -lDisplay disk usage for all files and directories in human readable format
du -ahDisplay total disk usage off the current directory
du -sh
DIRECTORY NAVIGATION
cd ..Go to the $HOME directory
cd ~Change to the /etc directory
cd /etc
SECURITY
passwdSwitch to the root account with root's environment. (Login shell.)
sudo -iExecute your current shell as root. (Non-login shell.)
sudo -sList sudo privileges for the current user.
sudo -lEdit the sudoers configuration file
visudoDisplay the current SELinux mode.
getenforceDisplay SELinux details such as the current SELinux mode, the configured mode, and the loaded policy.
sestatusChange the current SELinux mode to Permissive. (Does not survive a reboot.)
setenforce 0Change the current SELinux mode to Enforcing. (Does not survive a reboot.)
setenforce 1Set the SELinux mode to enforcing on boot by using this setting in the /etc/selinux/config file.
SELINUX=enforcingSet the SELinux mode to permissive on boot by using this setting in the /etc/selinux/config file.
SELINUX=permissiveSet the SELinux mode to disabled on boot by using this setting in the /etc/selinux/config file.
SELINUX=disabled
LOGGING AND AUDITING
dmesgDisplay logs stored in the systemd journal.
journalctlDisplay logs for a specific unit (service).
journalctl -u servicename